How to Optimize Images for Website Speed and SEO
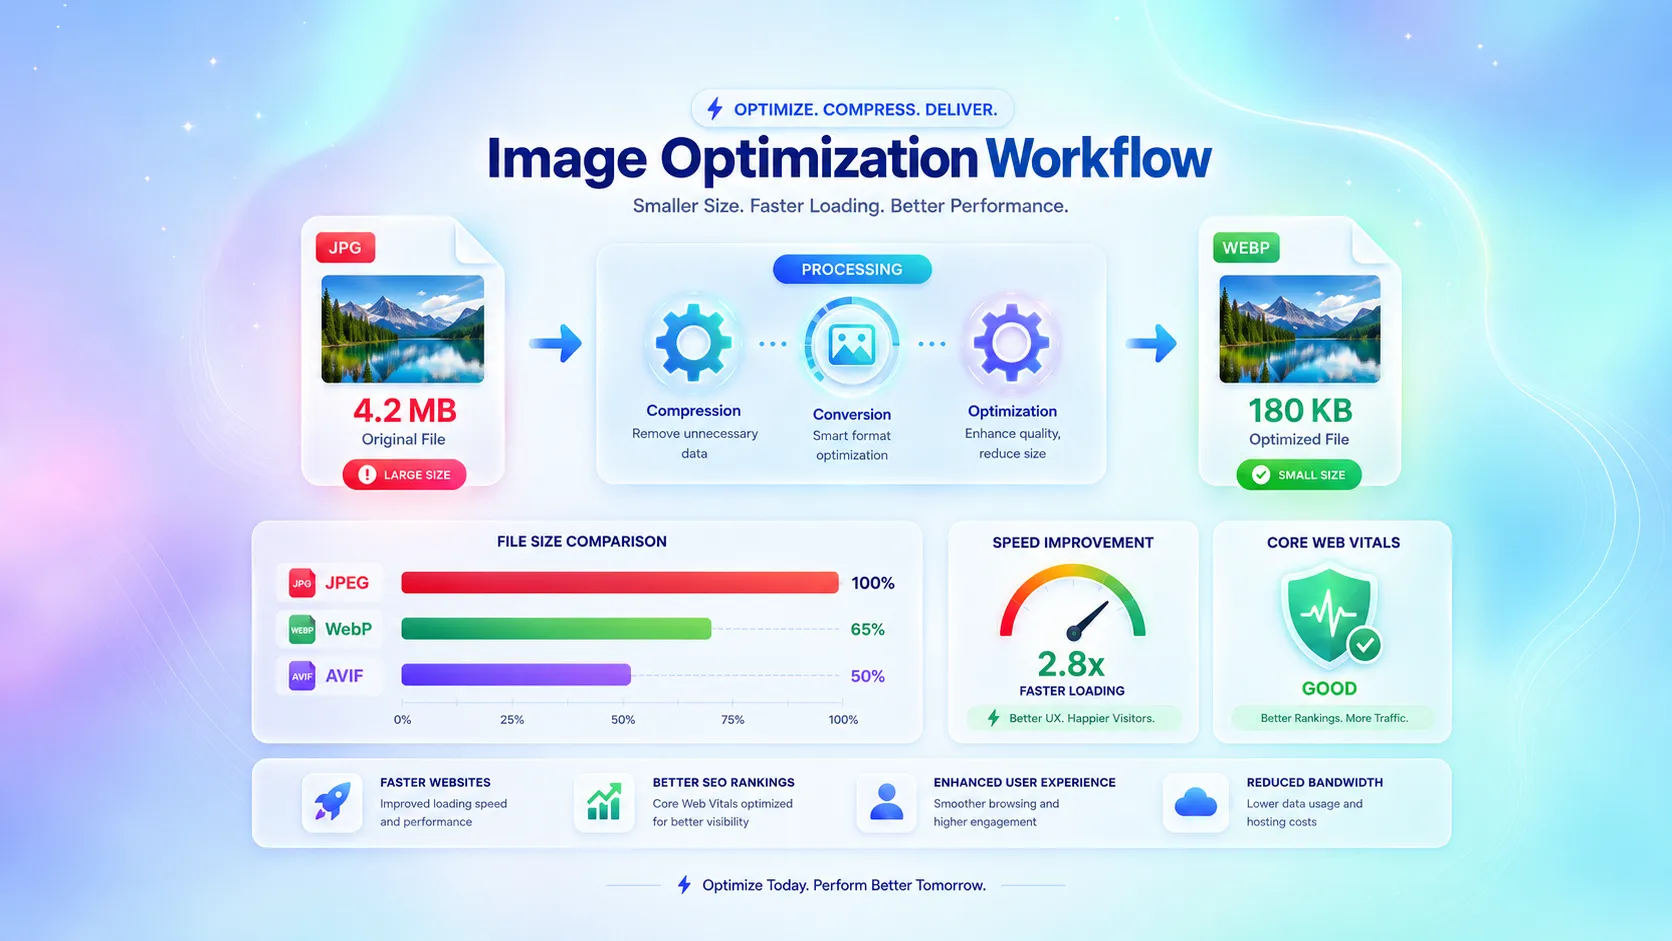
Images are the heaviest assets on most websites. According to HTTP Archive data, images account for roughly 40–50 percent of total page weight on the average webpage. A single unoptimized photo from a smartphone can be 4–8 MB — enough to double a page's load time on a mobile connection.
The problem is not just speed. Google's Core Web Vitals — specifically Largest Contentful Paint (LCP) — directly measure how fast your main content becomes visible. Since images are often the LCP element, unoptimized images can push your page below Google's ranking threshold.
This guide covers everything you need to know about optimizing images for the web: choosing the right format, compressing without visible quality loss, converting between formats, and handling metadata correctly.
Why Image Optimization Matters for SEO
Google confirmed page speed as a ranking factor in 2018 and reinforced it with Core Web Vitals in 2021. Three metrics matter:
- Largest Contentful Paint (LCP) — measures when the largest visible element loads. For most pages, that element is an image. Google's threshold: under 2.5 seconds.
- Cumulative Layout Shift (CLS) — measures visual stability. Images without explicit width and height attributes cause layout shifts as they load.
- Interaction to Next Paint (INP) — measures responsiveness. Heavy images can block the main thread during decode and paint.
A page that loads a 5 MB hero image will almost certainly fail the LCP threshold on mobile. The same image compressed to 150 KB in WebP format loads in a fraction of the time — and ranks better.
Beyond Core Web Vitals, image optimization also affects crawl budget. Google allocates limited resources to crawl each site. Pages that load slowly consume more crawl budget per page, leaving fewer resources for indexing your other content.
Choosing the Right Image Format
Not every format suits every use case. Here is a practical comparison:
JPEG (JPG)
JPEG uses lossy compression and is the default for photographs. At quality 80–85, JPEG delivers a good balance between file size and visual quality. It does not support transparency.
Best for: Photos, product images, blog post images, social media graphics.
PNG
PNG uses lossless compression, meaning the image looks identical to the original. File sizes are larger than JPEG for photographs, but PNG is the only common format that supports full alpha transparency.
Best for: Logos, icons, screenshots, images with text overlay, anything requiring transparency.
WebP
WebP was developed by Google and supports both lossy and lossless compression. At equivalent visual quality, WebP files are roughly 25–35 percent smaller than JPEG. WebP also supports transparency (like PNG) and animation (like GIF). Browser support is now near-universal at approximately 97 percent.
Best for: Almost everything on the web. WebP is the current best all-around format for website images.
AVIF
AVIF offers even better compression than WebP — typically 20–35 percent smaller at equivalent quality. However, encoding is significantly slower, and browser support sits at approximately 93–94 percent.
Best for: High-visibility hero images and static assets where maximum compression matters and encoding time is acceptable.
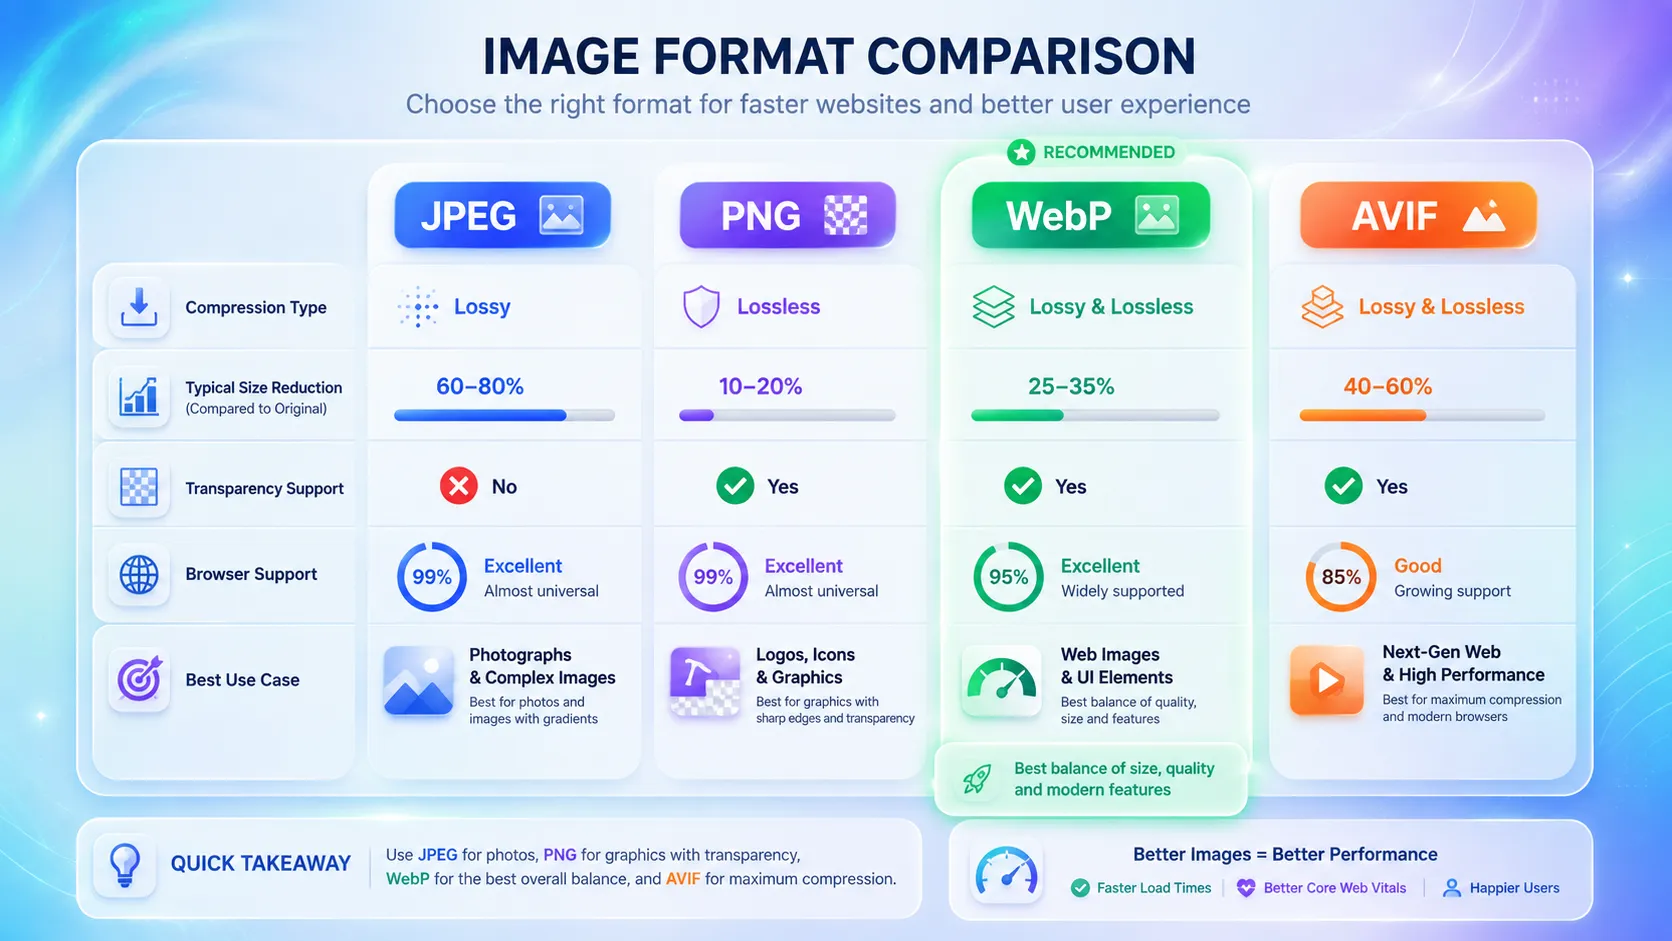 Side-by-side comparison chart of JPEG, PNG, WebP, and AVIF image formats showing compression ratio, transparency support, browser compatibility, and best use case for each format
How to Compress Images Without Losing Quality
Compression is where the biggest file size savings happen. The key distinction is between lossy and lossless compression.
Lossy Compression
Lossy compression removes data that the human eye is unlikely to notice. JPEG at quality 80 is visually indistinguishable from quality 100 for most photographs, but the file size can be 60–70 percent smaller.
Modern encoders like MozJPEG produce better results than older JPEG encoders at the same quality setting. The Image Compressor on GeoImageTagger uses MozJPEG, OxiPNG, and libwebp — all running as WebAssembly directly in your browser — to deliver optimal compression for each format.
Lossless Compression
Lossless compression reduces file size without removing any image data. The output is pixel-identical to the input. PNG optimization through tools like OxiPNG can reduce file sizes by 10–30 percent without any quality loss.
Practical Compression Workflow
- Start with your highest-quality original. Never compress an already-compressed image — quality loss compounds.
- Choose quality 75–85 for JPEG and WebP. This range offers the best size-to-quality ratio for web use.
- Use lossless compression for PNG. Since PNG is already lossless, further lossy compression would defeat its purpose.
- Resize before compressing. A 4000×3000 pixel image displayed at 800×600 on your site wastes bandwidth. Set a maximum dimension that matches your layout.
- Batch process. If you have multiple images, compress them all at once to save time. The Image Compressor supports uploading up to 10 images per batch.
Converting Images to WebP and Other Formats
Format conversion is the other major optimization lever. Converting a JPEG to WebP can reduce file size by 25–35 percent at the same visual quality — without any additional quality loss from compression.
When to Convert
- JPEG to WebP — the most common conversion. Reduces file size significantly with near-universal browser support.
- PNG to WebP — useful when you need smaller files but do not need full lossless fidelity.
- HEIC to JPG or WebP — iPhone photos are stored in HEIC format, which most browsers and CMS platforms cannot display. Converting to JPG or WebP makes them web-compatible.
- TIFF to JPG or WebP — TIFF files from professional cameras or scanners are typically very large. Converting them for web use is essential.
The Image Converter on GeoImageTagger supports converting between JPG, PNG, and WebP in any direction, with HEIC and TIFF supported as input formats. Like the compressor, conversion runs entirely in your browser using WebAssembly.
Preserving Metadata During Conversion
Most image converters strip metadata during conversion. This is a problem if you rely on embedded GPS coordinates, IPTC copyright fields, or XMP descriptions for SEO or archival purposes.
Both the Image Compressor and Image Converter include a "Preserve Metadata" checkbox that is enabled by default. When enabled, all EXIF, GPS, IPTC, and XMP data from the original image are copied into the compressed or converted output and verified by the server. This means you can compress a geotagged photo for your website and keep the location data intact.
If you need the opposite — stripping metadata for privacy before sharing — the EXIF Remover handles that.
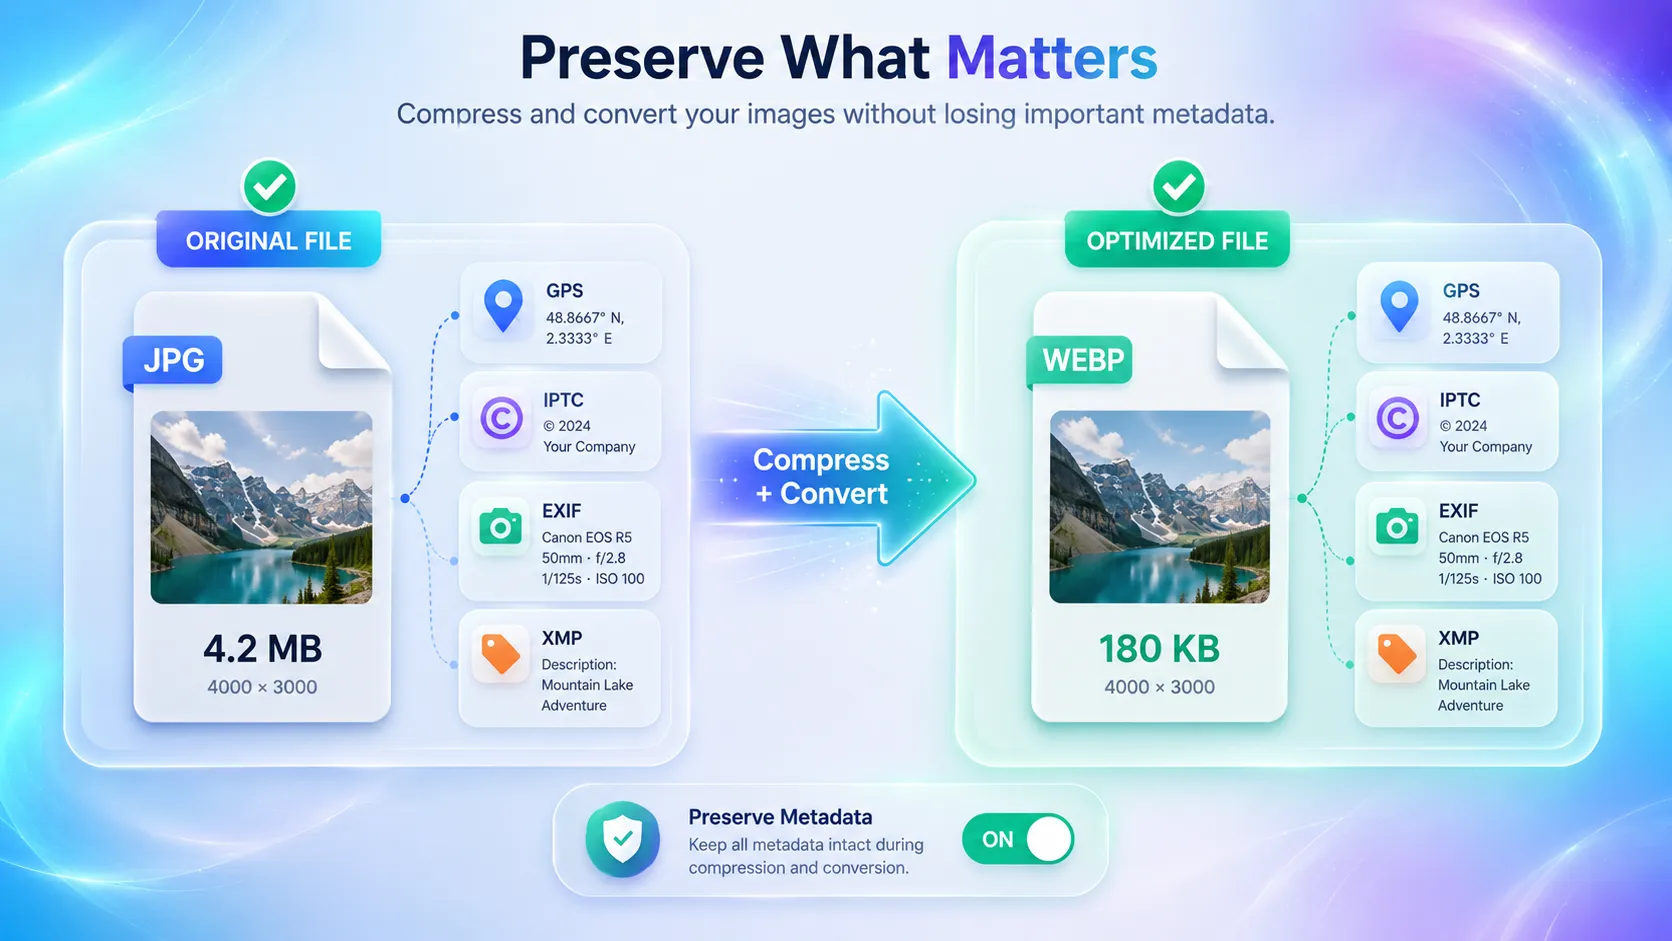 Diagram showing how image metadata including GPS coordinates and IPTC copyright fields are preserved during compression and format conversion with verify checkmark
Image SEO Beyond File Size
Optimizing images for SEO goes beyond compression. These practices help search engines understand and rank your images:
Alt Text
Write descriptive alt text for every image. Alt text is the primary way Google Images understands what an image depicts. Good alt text describes the image content naturally while including relevant keywords.
Descriptive Filenames
Use descriptive, kebab-case filenames instead of defaults like IMG_2045.jpg. A filename like compressed-webp-image-comparison.webp tells search engines what the image contains before they even analyze it.
Image Dimensions and Layout Shift
Always specify width and height attributes on your <img> tags, or use CSS aspect-ratio. This prevents Cumulative Layout Shift by reserving space for the image before it loads.
Lazy Loading
Add loading="lazy" to images below the fold. This defers loading until the user scrolls near the image, reducing initial page weight. Do not lazy-load the LCP image — that should load immediately.
Image Metadata for SEO
EXIF and IPTC metadata can provide additional context to search engines. Google has confirmed that it reads IPTC metadata in images. Fields like copyright, description, and keywords can reinforce your content's relevance. Use the Metadata Editor to add or update these fields, or the Metadata Viewer to inspect what metadata your images already contain.
Complete Image Optimization Checklist
Here is a step-by-step workflow for optimizing any image for the web:
- Start with the highest-quality original image
- Resize to the maximum display dimension your layout requires
- Choose the right format (WebP for most use cases, PNG for transparency, JPEG for maximum compatibility)
- Compress at quality 75–85 for lossy formats, or use lossless optimization for PNG
- Preserve or strip metadata based on your needs (preserve for SEO/archival, strip for privacy)
- Write descriptive alt text and use a meaningful filename
- Add width and height attributes to prevent layout shifts
- Use lazy loading for below-the-fold images
- Test with Google PageSpeed Insights to verify LCP and CLS improvements
If you work with geotagged images, product photos with embedded descriptions, or any images where metadata matters, GeoImageTagger provides a complete toolset for compression, conversion, metadata editing, and metadata removal — all in one platform. Each tool runs in your browser for privacy and speed, with server-side metadata verification when needed.
Frequently Asked Questions
Does image compression affect SEO?
Yes, positively. Compressed images load faster, which directly improves Largest Contentful Paint scores. Google uses Core Web Vitals as a ranking signal, so faster-loading images contribute to better search rankings.
What is the best image format for websites in 2026?
WebP is the best all-around format for most website images. It offers 25–35 percent smaller files than JPEG at equivalent quality, supports transparency, and has near-universal browser support at approximately 97 percent. AVIF offers even better compression but with slower encoding and slightly lower browser support.
Does compressing images remove metadata?
It depends on the tool. Many online compressors strip all metadata during compression. The Image Compressor on GeoImageTagger preserves metadata by default — all EXIF, GPS, IPTC, and XMP data are copied into the output and verified. You can toggle this off if you want smaller files or privacy.
How much can I reduce image file size?
Typical results: JPEG at quality 80 reduces file size by 40–70 percent compared to quality 100. Converting JPEG to WebP at equivalent quality saves an additional 25–35 percent. Combined, you can often reduce a 4 MB photo to under 200 KB with no visible quality difference.
Should I convert all my images to WebP?
For most websites, yes. WebP offers the best compression-to-quality ratio and is supported by all modern browsers. The main exception is if you need full lossless PNG transparency for detailed graphics, or if your audience uses very old browsers. You can use the HTML <picture> element to serve WebP with a JPEG fallback for maximum compatibility.
Can I compress images and keep GPS coordinates?
Yes. When using the Image Compressor or Image Converter on GeoImageTagger, the "Preserve Metadata" option (enabled by default) ensures all GPS coordinates, IPTC keywords, and XMP data are retained and verified in the compressed or converted output.
Conclusion
Image optimization is one of the highest-impact, lowest-effort improvements you can make to a website. Choosing the right format, compressing at an appropriate quality level, and handling metadata correctly can cut page weight by 60–80 percent — directly improving Core Web Vitals, SEO rankings, user experience, and hosting costs.
The key is making optimization a routine part of your workflow rather than a one-time cleanup. Every image that goes on your website should be resized, compressed, and properly formatted before upload. With browser-based tools that preserve metadata and handle batch processing, there is no reason to skip this step.
← Back to Blog