How to Add a Watermark to Photos and PDFs Online: Text, Logo, Signature & Hidden Watermarks
Whether you are a photographer protecting a portfolio, a business branding product images, or a freelancer marking client proofs as drafts, adding a watermark is one of the fastest ways to assert visual ownership of your work. The challenge is choosing the right watermark type and applying it without degrading image quality.
This guide walks through every practical watermark option — text, logo, handwritten signature, tiled patterns, and invisible hidden watermarks — and shows how to apply each one to images and multi-page PDFs directly in your browser.
What Is a Watermark?
A watermark is a mark — text, image, or encoded data — placed on or inside a file to indicate ownership, discourage unauthorized use, or label a document's status (such as "DRAFT" or "CONFIDENTIAL").
Watermarks fall into two categories:
- Visible watermarks are rendered directly on the image pixels. Anyone viewing the image can see them. Examples include a photographer's name across a photo, a company logo in the corner, or a "SAMPLE" stamp on a proof.
- Hidden (invisible) watermarks are embedded inside the pixel data using steganographic encoding. They are imperceptible to the human eye but can be extracted later with the right tool — providing an embedded identifier that can support provenance or ownership claims if someone removes the visible watermark.
Each type serves a different purpose, and combining them provides the strongest protection. If your broader goal is a full photo-protection strategy covering copyright metadata, DMCA enforcement, and monitoring, see How to Protect Your Photos from Theft Online.
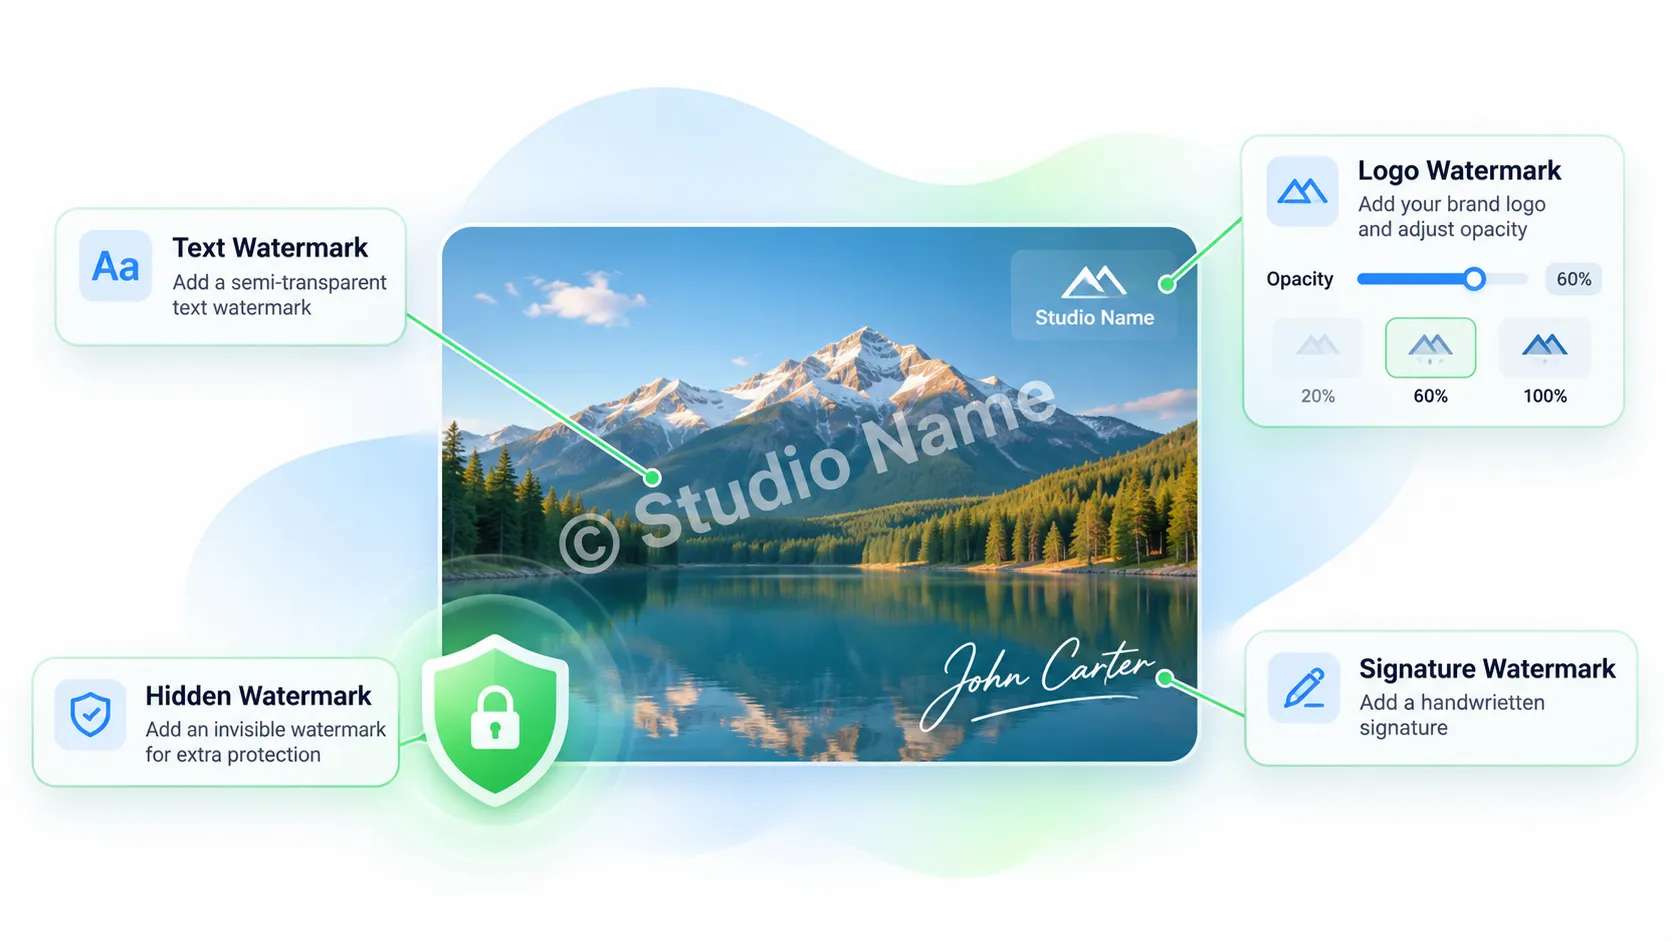
Types of Watermarks and When to Use Each
Text Watermark
A text watermark overlays your name, brand, copyright notice, or any custom text directly onto the image. It is the most common and versatile option.
The Watermark Tool provides full control over font, size, color, opacity, rotation, and position. You can also apply visual effects including gradient fills, outline, curved text, shadow, and glow — plus bold and italic styling.
Best for: photographers who want a simple copyright notice, businesses adding brand names to product photos, and anyone who needs a quick, customizable mark.
Logo or Image Watermark
A logo watermark uses your brand logo or any image file as a transparent overlay. Upload a PNG, JPG, or WebP logo, then adjust opacity, scale, and position.
Best for: studios, agencies, and brands that want consistent visual branding across their entire image library. A semi-transparent logo in the corner is the standard approach for professional portfolios.
Handwritten Signature Watermark
The signature watermark lets you draw your signature directly on screen using a mouse, stylus, or finger on a touch device. The signature pad supports pressure-sensitive input and stroke undo. Once drawn, your signature is placed on the image as a watermark layer with adjustable position and opacity.
Best for: artists, illustrators, and photographers who want a personal, authentic mark that cannot be easily replicated by someone typing a name.
Tiled or Repeated Watermark
Tiled watermarks repeat your text or logo across the entire image in a grid pattern. You can adjust spacing, rotation angle, and opacity.
Single-placement watermarks can be cropped out relatively easily. Tiled watermarks are much harder to eliminate by simple cropping because the watermark repeats across the image. Removing a tiled watermark usually requires substantially more editing than removing a single corner watermark and may damage or alter underlying image content. This makes tiling the strongest visible deterrent.
Best for: portfolio previews, client proofs, stock photography samples, and any image where you want to discourage unauthorized use while still showing the content for evaluation.
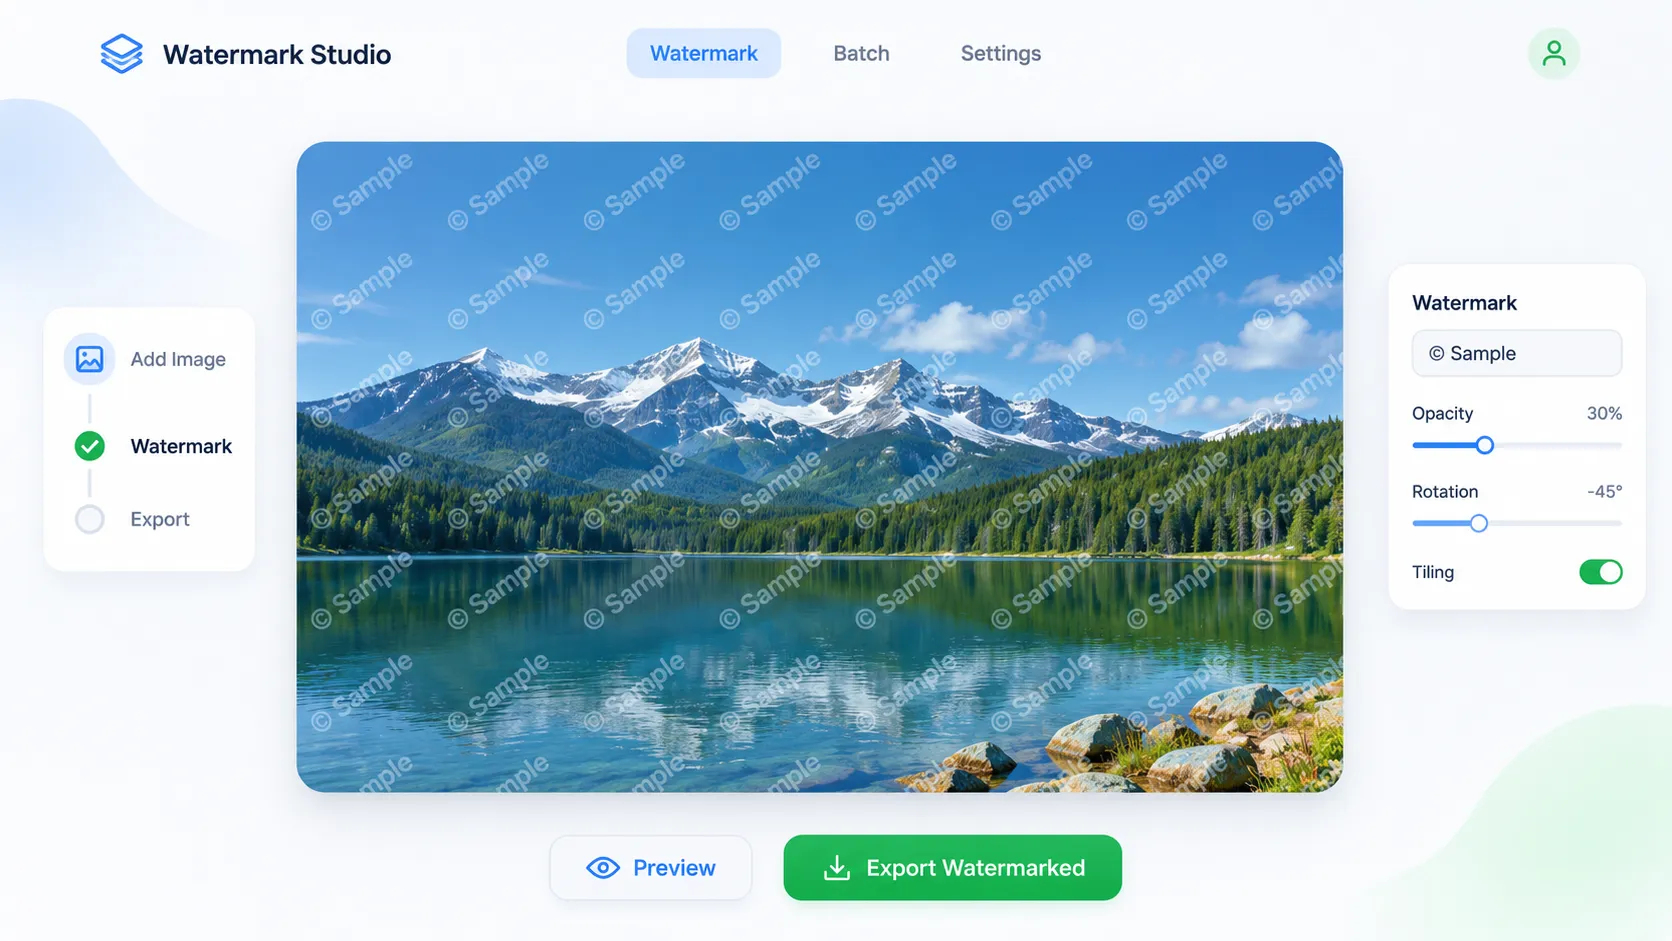 Example of a tiled watermark pattern showing repeated text watermarks evenly spaced across an entire photograph at low opacity
Hidden or Invisible Watermark
A hidden watermark uses steganographic encoding to embed an invisible text payload into the pixel data. The watermark is imperceptible to the human eye but can be extracted and verified using the built-in verifier in the Watermark Tool.
Important technical limitation: The hidden watermark requires PNG export. JPEG and WebP compression alters pixel values, which destroys the encoded data. The hidden watermark is designed for a lossless PNG workflow and should not be expected to survive lossy re-encoding, screenshots, heavy cropping, or platform re-compression.
Best for: supplementing a visible watermark with an embedded identifier. If someone removes the visible mark, the hidden watermark may still be extractable from the original-resolution PNG and can provide supporting evidence that a specific identifier was embedded in the original file.
How to Watermark an Image Online
The entire workflow runs in your browser — no server upload, no signup, no installation.
- Upload your image. Drag and drop or browse for your file. Supported formats include JPG, PNG, WebP, HEIC (iPhone photos), and TIFF. Maximum file size is 20 MB.
- Choose your watermark type. Select text, logo, signature, date stamp, border, or hidden watermark. You can stack multiple layers — for example, a text watermark plus a hidden watermark.
- Customize the appearance. Adjust font, size, color, opacity, position, and rotation. Enable tiling to repeat the watermark across the entire image.
- Preview the result. The live preview updates in real time as you adjust settings.
- Export. Download your watermarked image in JPG, PNG, or WebP format. For JPG and WebP, a quality slider lets you balance file size against quality. PNG exports are lossless.
If your image needs cropping, resizing, or background removal before watermarking, use the Image Editor first. If you want to compress the watermarked image for web use, the Image Compressor handles that without stripping your watermark.
How to Watermark a PDF
The Watermark Tool also supports multi-page PDF documents. Upload a PDF and apply text, logo, date, or border watermarks across all pages.
A key detail: the exported PDF preserves selectable text, clickable hyperlinks, and original page dimensions. There is no flattening or quality loss — your document content remains fully intact.
Common use cases:
- Client proofs stamped with "PROOF" or "DRAFT"
- Confidential reports with "CONFIDENTIAL" diagonal text
- Photography portfolios with branding across every page
- Contracts and proposals with company logos
 Illustration showing a multi-page PDF document with watermark text applied across all pages preserving selectable text and clickable links
Watermark Placement and Opacity Best Practices
Where to Place a Watermark
- Over complex areas — watermarks placed on detailed textures, patterns, or busy backgrounds are harder to remove with editing tools. Avoid placing watermarks over blank sky or solid-color backgrounds.
- Center or diagonal — a center-placed watermark is harder to crop than a corner watermark. Diagonal placement across the image offers a good balance between visibility and aesthetics.
- Full tiling — for maximum protection, tile the watermark across the entire image.
Choosing Opacity
- 25–40 percent is the standard range for portfolio previews: visible enough to deter, subtle enough to let viewers evaluate the image.
- 50–70 percent works for stronger branding or "PROOF" stamps where deterrence is the priority.
- Below 15 percent is typically too faint to deter anything.
Choosing Size
Scale your watermark proportionally to the image. A watermark that covers roughly 10–20 percent of the image width is large enough to be readable but not overwhelming. For tiled patterns, smaller individual marks with consistent spacing look more professional.
Common Watermarking Mistakes
- Placing watermarks in corners only. Corner watermarks are easily cropped. Use tiling or center placement for critical images.
- Using too-low opacity. A watermark at 5 percent opacity is invisible in practice. If the goal is deterrence, it needs to be visible.
- Expecting hidden watermarks to survive any format. Steganographic watermarks require lossless PNG. Do not rely on them surviving JPEG compression, screenshots, or processing by platforms that may resize or recompress uploaded images.
- Over-watermarking. A watermark that obscures the image entirely defeats the purpose if the goal is to showcase work. Find the balance between protection and presentation.
- Assuming watermarks are removal-proof. No watermark is impossible to remove. Watermarks are deterrents, not guarantees. They raise the barrier to unauthorized use, especially when tiled across complex areas.
Watermark vs. Copyright Metadata
Watermarks and copyright metadata serve different purposes:
| Visible Watermark | Copyright Metadata | |
|---|---|---|
| Where it lives | On the image pixels | Inside the file's EXIF/IPTC/XMP data |
| Visible to viewers | Yes | No (machine-readable) |
| Survives platform processing | Generally yes (part of pixel data) | Metadata may be removed or altered depending on the platform and sharing method |
| Can be removed | With effort (editing/cropping) | Trivially (metadata stripping) |
| Best for | Visual deterrence | Machine-readable ownership record, Google Images attribution |
For the strongest protection, use both. Add a visible watermark with the Watermark Tool, then embed copyright metadata with the Metadata Editor. The Metadata Viewer can verify that your copyright fields survived any processing step.
Whether you need to add a text watermark to a single photo, tile your logo across a portfolio, sign your artwork with a handwritten signature, or stamp "CONFIDENTIAL" across a multi-page PDF, the Watermark Tool handles every type of watermark in one place — free, private, and entirely in your browser.
Frequently Asked Questions
Is the Watermark Tool free?
Yes. All features — text, logo, signature, hidden watermark, PDF watermarking, tiling, and all visual effects — are available at no cost, with no signup and no usage limits. The tool does not add its own watermark to your output.
Do my files get uploaded to a server?
No. The Watermark Tool runs entirely in your browser using client-side processing. Your images and PDFs never leave your device.
What formats are supported?
Input: JPG, PNG, WebP, HEIC/HEIF, TIFF, and multi-page PDF. Export: JPG, PNG, or WebP for images; PDF for documents.
Can I add multiple watermark layers?
Yes. You can stack text, logo, signature, date stamp, border, and hidden watermark layers on the same image.
Will the hidden watermark survive if I share the image on a social or messaging platform?
Many social and messaging platforms may resize, recompress, or otherwise transform uploaded images. Such processing can alter pixel-level steganographic data, so hidden watermarks should not be assumed to survive platform processing. The hidden watermark is designed for lossless PNG workflows where the file is shared without re-encoding.
Can someone remove a watermark?
Visible watermarks can be removed with image editing software, especially when placed over simple backgrounds. Tiled watermarks covering complex areas are significantly harder to remove. No watermark is guaranteed removal-proof, but they substantially raise the effort required for unauthorized use.
Conclusion
Adding a watermark does not require expensive software or technical expertise. The right tool gives you full control over text, logo, signature, tiled, and hidden watermark options — all from your browser, without uploading files to any server.
Choose the watermark type that matches your goal: text for quick copyright notices, logos for brand consistency, signatures for personal authenticity, tiling for maximum deterrence, and hidden watermarks for embedded provenance support. For broader image protection strategies including copyright metadata and DMCA enforcement, see the full guide on how to protect your photos from theft online.
Explore all image tools at GeoImageTagger.
← Back to Blog